Tuesday, January 31, 2012

Recycled Bottle


recycled bottle, diy phone holder, diy docking station, shampoo bottle phone holder


Recycle soap/shampoo bottles to hold electronic devices while they charge.


recycled bottle docking station


1. Cut the bottle to the shape you want. I used scissors and an exacto knife. I really liked this shampoo bottle especially because the label peels off in one nice piece (huge plus!!) and it cut like buttah. I used patterned stationary paper to decorate it. You can buy it by the piece (about 50 cents) at most craft stores. Cut your paper to fit where you want it. I did a rough trace and then just trimmed away until I had the shape I wanted.

2. Mod Podge the back of your stationary paper onto bottle.

3. Trim away any excess or overhanging paper.

4. I added 3 coats of Mod Podge over the top of the paper to protect it.


If you don't feel comfortable having the plug or USB device support the weight of the devise, this idea also works well as cord control and storage with it sitting on a counter.


The excess cord stays curled inside the bottom of bottle.


From this...                                                           to this.


Especially great when traveling!


These were two other re-purposed bottles by Inhabitat and Make It and Love It (she decorated hers with fabric).


Click on image to go to link.

I found that my plugs were so bulky that they blocked the opening of the pouch where my phone rests, so mine is attached at the USB port. I experimented with a few different types of bottles until I found the right size.


Now...just try shopping for shampoo without seeing it's hidden potential as a phone holder!


Thursday, January 26, 2012

Friday's Photo


Self Portrait


Image is my reflection in a mirror and edited using Adjustable Threshold on Picnik.  

So sad they are closing! I have had so much fun with all their user friendly photo edits. I will really miss it!!

**After Publish Edit**
Yes, self-portraits are terribly awkward. Especially when posing for a self-timer. I wasn't crazy about any that I took and had all the excuses that Darcy brought up. But this is a challenge after all and we're going to be spending the year together so you might as well know what I look like...in front of a camera.


Okay! Glad that's over! On to next week's SHADOWS!
Phew
Thanks for visiting and happy Friday!

Sunday, January 22, 2012

A Valentine Garland


valentine craft, valentine garland, diy valentine


This is a simple heart garland that I made using two pieces of felt. Cost = 50 cents!!!
I sewed mine, but I bet you could hot glue it or use fusible tape.


1. Cut felt rectangles in half, lengthwise.
2. Fold one strip in half (lengthwise) and sew ends together.


3. Turn tube inside-out so that the seam you just made is inside the tube.
4. Make another seam along the opposite side of your first seam. The purpose of this seam is to pinch the fabric together. This is the bottom of your heart.


TaDaaa!!!! See the heart?


Cut into strips approximately 1 inch wide.


valentine hearts, valentine's day craft, valentine garland

I came up with 55 hearts from the two pieces of felt.


They could also be strung vertically. 
Sooo cute and much healthier than chocolates!!

Thursday, January 19, 2012

Friday's Photo


The topic for this week was, I Dream A Dream. I  kinda got stuck. There are so many ways to interpret this theme. I ended up with these photos of my son reading. Reading a good book is like dreaming. It pulls you in and takes you away. And for a child there's something extra exciting about reading late into the night, after your bedtime, with a flashlight-so you don't get caught.


I couldn't decide which one to pick.
??
Happy Friday!!

Wednesday, January 18, 2012

Valentine Cupcakes


heart cupcakes, valentine treats, heart shaped cupcakes


I came across this fabulous idea on Pinterest and decided to see how it worked "in real life." 

A heart cupcake.

valentine cupcakes, heart shaped cupcake hack, heart shape cupcakes

All you need are some marbles, but a ball of aluminum foil would work just as well.


That's it!
  I made the hearts from blueberry muffins. Not very valentiney, but I was making some anyway and wanted to see how they would turn out. My only complaint is that the bottom is round and not very heart shaped, but decorating the top with a colored sugar heart (or frosting...but not on a blueberry muffin. Ewwww. OR maybe not eww?? Hmmmm...?) helped to make the heart shape stand out. Also don't fill the baking cups too high with  batter because if it rises too high over the cups, they will fill in at the gap and look more like a blob than a heart.

Isn't that fun?! And easy!


diy heart shaped cupcakes, valentine cupcakes

Thursday, January 12, 2012

Friday's Photo: Made With Love


 The weekends of my childhood were spent with my grandma at her house. One weekend we made a blanket for my doll. I got to pick the fabric and she did the sewing. 
This is that blanket


Happy Friday. Thanks for visiting.

Wednesday, January 11, 2012

Success Fighting Acne

* This is a acne skin care routine that has worked for my son. Everybody is different and reacts differently to different products. Please carefully read the instructions and warnings that are on the backs of the products before you use them.*

 *Not great quality pics. The acne actually got  much worse than this BEFORE  picture. I felt bad taking this picture. If I would have known that soon he was going to be blemish free I would have have taken better BEFORE  pictures.

I wanted to write this post to report the huge success my 13 year old son *(my son is now 15 years old and still follows this routine)*  has has with an over the counter skin care routine that has made his acne disappear. I'm not trying to sell anything!!! I just wanted to share our experience and hope that it can help someone or give hope.

I have never had acne, but my 13 year old son started breaking out over the summer. I scoured the web looking for acne remedies and after finding that most sites just want to sell you their products or recommend prescription lotions, shots, and pills, I finally came across acne.org . This is such a helpful site!!! The site does sell an acne skin care line, BUT it also lists replacement products that can easily be purchased in most drug stores. There are also independent reader reviews for most of the acne treatments out there. And video instructions showing exactly the skin care routine that the author of the site now uses with success.

My 13 year old  has very greasy skin. Especially the T zone on his face. Also, his hair gets so greasy it looks wet within 12 hours of washing. This regimen works for him. It took a few weeks before we saw a noticeable difference. You have to stick with it and you must follow the routine in the morning and night. Twice a day. If my son gets lazy and skips a step or the whole skin care routine altogether, he breaks out the next day. This has been his skin care routine for the past 5 months. It's not exactly the acne.org routine. He did follow that to a tee for the first month, but I think over time everyone starts doing their own thing. The core of this routine is loosely based on acne.org's.

Because my son is not big on grooming in general, we were able to whittle down his routine to two steps, twice a day, everyday, with success. A couple of times a month (or every weekend if needed) he applies a store bought microdermabrasion. This really seems to help with blackheads in particular. They squeeze out so much easier right after this. Eeewww, I know. Nobody loves to talk about it...but there it is.

Step One: (morning and night)
Wash face. Two pumps of the Clean&Clear foaming facial cleanser on a microfiber washcloth that is wet with hot water. Rub lightly all over entire face. Rinse the washcloth in hot water until the soap is out and then wipe face with the washcloth until all the soap is off face.

Step Two: (morning and night)
Apply a nickel size dollop/blob of  a benzoyl peroxide gel to fingertips and rub completely into skin. Avoid the eye area. This is the KEY acne fighter. Don't be afraid to use more, especially in the areas that a prone to breakouts. When skin is clear use less and less until you find the right amount that maintains clear skin. Over time my son has found that a nickel sized dollop/blob is enough.

That's it!!! Step three can be a lotion because benzoyl peroxide can dry out the skin. My son is using the 10% benzoyl peroxide and doesn't get dry skin or peeling.There is a 2.5% benzoyl peroxide by Neutrogena for more sensitive skin.

These are the products he uses, twice a day:

helps to clear acne

(1) The clean&clear face soap (2) and the Target brand "maximum strength acne medication benzoyl peroxide gel."
{He has also had great success with Zapzyt and the Walmart brand benzoyl peroxide (both also 10% benzoyl peroxide) creams.}


acne cream

** 12-17-2013 edit **
I have also found Dr Sheffield's Clear-Zit (10% benzoyl peroxide) at the 99 Cent store and it also works!!


***

This is the microdermabrasion, found at Target, that he applies a few times a month, depending on the amount of blackheads. Sometimes it's once a week.

Again, this is what works for my son. Everyone is different. I just wanted to share a success story in the hopes that it might help someone else. I am more than happy to answer any questions that I can. I am not a doctor, I can just share what I have learned from my son's experience.

Tuesday, January 10, 2012

Wood Floor Tutorial

This was a project completed in 2007 pre-blog, so the pictures aren't great and they aren't very detailed. Sorry. I think there are enough images to give you the idea, but mostly I want to encourage anyone who is thinking of tackling this, but is hesitant because it seems too difficult. It is not difficult. It is, however, time consuming.
The cost of paying a professional to do this can be steep. I found that it was almost equal to the cost of materials. So if you decide to do this yourself you could cut your costs in half. Go For It!

The wood used here is Home Depot Direct, Brazilian Cherry, engineered wood. I don't think it's made anymore, but most of these engineered hardwood floors are similar and the process of installation is the same. Also, this floor is glued down. Not nailed. Our wood floor was installed onto a concrete foundation.


Brazilian cherry hardwood floor
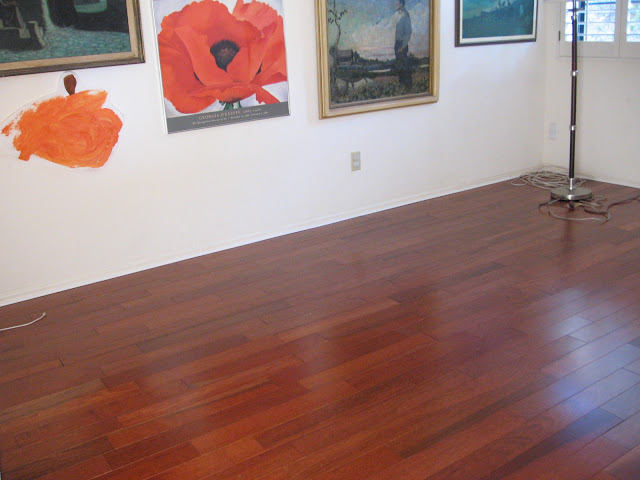
The completed floor. Brazilian Cherry.

Our house was mostly saltillo tile with carpet in the bedrooms and den. We installed wood in those three rooms and these pictures will jump between those rooms to show the steps. Confused??? Me too! Okay... don't pay attention to the room-just the floor-because I'm skipping from room to room to show the different steps.


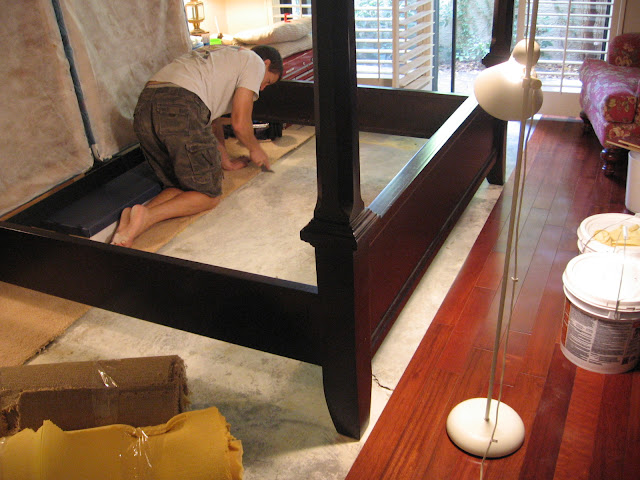
The first step involves cleaning the floor. We removed the old carpet, its padding, and any of the glue that held the padding in place. You want the wood floor adhesive to be in direct contact with the cement foundation. We had white paint spray all over the floors from when the house was built. We went over it with a scraper and a wet rag.

installing hardwood floor
Here you can see some of the floor getting prepped and because we were still sleeping in this room, we worked in sections and moved around the giant bed. We did not remove the baseboards or add cherry wood trim to the edges. I'll show you how we dealt with that further down in this post.


 installing hardwood floors onto cement foundation
Figure out which direction you want the wood floor to run and then start along a wall. Most room walls are not perfectly straight-we used a perfect 2X4 (seen above) as a straight edge/guide and would check that a row was staying straight as we went (every few rows). Make sure the pieces are fitting tightly together. You may need to use a rubber mallet, or a block of wood, to tap (lightly) pieces tight. It is important to keep a small space between the wood flooring and the edges of the room (baseboards/walls) because the wood floor will expand and contract with the weather. You can see the blue spacers running along the baseboard in the picture above. We used a circular saw to cut the wood flooring when needed.


glue for wood floor

This is the wood  floor adhesive we used. It was from Home Depot. There are instructions written on the bucket. Depending on the climate in your area, the glue dries fairly fast. We are in a dry climate, Arizona, and found that it was best to only apply about 30 working minutes worth of glue at a time. Apply in in a neat line to match your rows.


Apply adhesive to floor with a notched trowel. ** TIP** We found it was best to always place the wood so that the tongue (tongue&groove) end was facing in, towards the room.
Placing the tongue side INTO the grooved side doesn't smear the glue around as much as if you were to place the groove ONTO the tongue side. But it's not necessary, just a personal preference.

 Reject pieces (there will be some) were marked up with pencil. This piece has many surface cracks.


installing hardwood floor, diy installing engineered wood floor
Because of the slight inconsistency in the colors of the wood planks and the different lengths, we went through the planks first and set  them down (without glue!) on the floor to make sure that the different shades of cherry and the different lengths of the planks would be evenly spread throughout the room. The planks on the right side are the dry run and the planks on the left are glued.


baseboard and trim for engineered hardwood floors, glued down wood floors
Instead of covering the small gap at the edges with matching cherry wood trim I decided add a piece of trim that would look like a piece of detail from the original baseboards. It was a lot cheaper than the matching pieces of wood trim and I prefer this look.


baseboard and trim corner for hardwood floors
Corner detail.


Brazilian hardwood floor and saltillo tile
At the edge where the wood floor meets the tile (the doorways) I went AGAINST instructions, and recommendations, and put the wood almost right up against the tile. I didn't want to use a piece of pesky trim. So far so good...


Brazilian cherry engineered wood floor and saltillo tile
Diagonal cut along the tile.


Some before and afters:


Before


Brazilian cherry wood floor, cherry wood floor, diy wood floor tutorial, engineered wood floor tutorial
After


Before


After